
Theme option cho phép bạn lưu các cài đặt cần thiết của theme như logo, mầu sắc, thông tin header, footer…Ở bài viết trước mình liệt kê 1 loại những theme option framework đầy sức mạnh để thiết kế wordpress theme. Tuy nhiên bạn có thể tạo riêng theme option đơn giản phục vụ cho nhu cầu bình dân của bạn.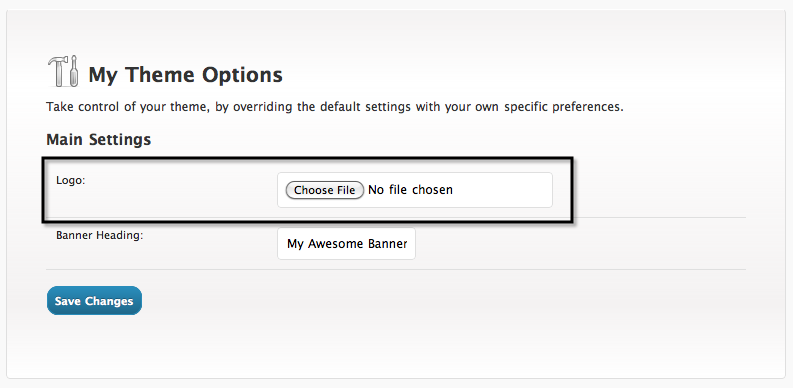
Hướng dẫn cơ bản
Chép code sau vào functions.php.
add_action( 'admin_init', 'register_settings' );
function register_settings(){
	//đăng ký các fields settings
	register_setting( 'my-settings-group', 'phone' );
	register_setting( 'my-settings-group', 'company_address' );

}
Hàm register_setting dùng để đăng ký options, tất cả các options được sử lý trong form cần đăng ký vào 1 nhóm đặt tên tùy ý bạn, mình đặt là “my-settings-group”.
Ví dụ trên đơn giản là tạo 2 field lưu số điện thoại và địa chỉ công ty. Trước hết tạo Menu page để hiển thị form options.
<?php
// create custom plugin settings menu
add_action('admin_menu', 'my_create_menu');
if(!function_exists('my_create_menu')){
function my_create_menu() {
	//menu page
	$page=add_menu_page( 'My Theme option', 'Theme Options', 'manage_options', 'my-optionpage', 'my_settings_page', plugins_url( 'myplugn/images/icon.png' ), 6 );

  //call register settings function
  add_action( 'admin_init', 'my_register_settings' );
}
}
?>
– Xem cách tạo Menu Page nếu chưa biết tại đây.
Hiển thị theme option form để lưu thay đổi cài đặt.
<?php
if(!function_exists('my_settings_page')){
function my_settings_page() {
?>
<div class="wrap">
<h2>Theme Settings</h2>
<form id="landingOptions" method="post" action= "options.php">
  <?php settings_fields( 'my-settings-group' ); ?>
  <p><label for="phone">Phone</label><br/>
  <input type="text" name="phone" value="<?php echo get_option('phone')?>"/></p>

  <p><label for="company_address">Company Address</label><br/>
  <textarea name="company_address"><?php echo get_option('company_address')?></textarea></p>

  <p class="submit">
  <input type="submit" class="button-primary" value="<?php _e('Save Changes') ?>" />
  //hoặc dùng sẵn
  <?php submit_button(); ?>
  </p>
</form>
</div>
<?php }} ?>
sử dụng hàm settings_fields với nhóm fields để xác thực bảo mật (wp_nonce) cho từng form lưu các nhóm options trên một trang option. Mỗi options nhóm vào một trang có tên cài đặt là ‘option_page’. Ví dụ hàm settings_fields( ‘my-settings-group’ ); ở trên tạo các hidden fields giống như sau:
<input type="hidden" name="option_page" value="my-settings-group" />
<input type="hidden" name="action" value="update" />
<input type="hidden" id="_wpnonce" name="_wpnonce" value="b50e972db1" />
<input type="hidden" name="_wp_http_referer" value="/wordpress/wp-admin/admin.php?page=my-optionpage" />
Bạn có thể tham khảo thêm trên WordPress Codex: http://codex.wordpress.org/Creating_Options_Pages
– Các bạn download code mẫu này ở file đính kèm rồi mở functions.php include nó vào.
//functions.php
.....
include('sample-theme-option-hoangweb.php');
Hạn chế của cách này là muốn thêm option khác phải can thiệp vào code. Vậy có cách nào không cần chỉnh sửa code mà thêm động được các options mới không? Bạn xem cách dưới nhé.
Tạo Theme options động (Dynamic theme options)
Mình có tham khảo một vài plugin và custom riêng cho mình một bộ code này, các bạn tải ở phía dưới giúp mình ha.
Custom Option Plus
Mình mới tìm ra plugin này cũng khá hay, cho những ai không rành về code vẫn có thể tạo được các options riêng cho mình. Mặc định plugin custom option plus không hỗ trợ TinyMCE để bạn nhập chuỗi HTML, tuy nhiên mình có sửa lại đôi chút để tích hợp trình soạn thảo WYSIWYG sử dụng trong plugin.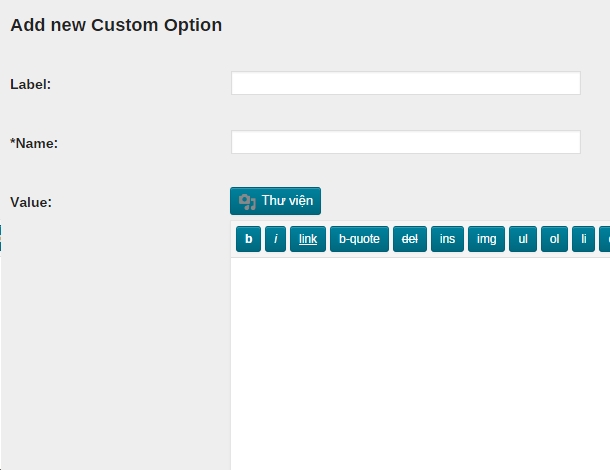
Để lấy một option bạn sử dụng hàm get_custom. VD:
<?php echo get_custom('name'); ?>
Thay ‘name’ với tên option bạn thiết lập vào trường *Name.
Easy Theme Options (Quản lý nhóm Tab Theme options)
Easy Theme Options cung cấp giải pháp khá linh hoạt, tạo theme options với đúng nghĩa của nó như wordpress sử dụng mặc định. Bạn có thể tạo nhiều options và chia vào các nhóm với mục đích sử dụng theo ý muốn. Hiện tại để thêm option mới bạn sửa trực tiếp vào plugin tuy nhiên để cho linh hoạt bạn có thể viết riêng vào từng theme trong file functions.php
Sau khi cài đặt plugin Easy Theme Options, bạn được sử dụng sẵn đầy đủ một số kiểu trường dữ liệu như text input, textarea, password, checkbox, selectBox, radio…
Thiết lập Theme option bạn Truy cập vào Appearance->Theme Options các options hiển thị như hình dưới đây: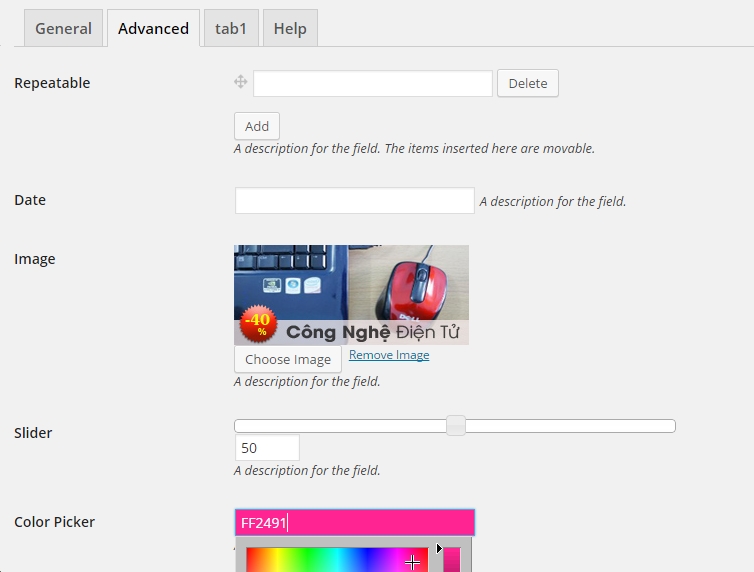
Plugin có hướng dẫn mở rộng cho phép lưu thêm options bạn tự định nghĩa. Tạo mới tab và chèn thêm field vào tab bạn đều thực hiện trong file options.php
Để tạo một tab bạn khai báo vào biến $eto_custom_tabs, và nhóm các fields vào tab bạn liệt kê vào biến $eto_custom_meta_fields. Ví dụ: mình thêm tab ‘new tab’
$eto_custom_tabs = array(
		array(
			'label'=> __('new tab', 'eto'),
			'id'	=> $prefix.'tab1'
		)
	);
Bạn có thể sửa tiền tố chung cho plugin và cũng là tên cho option bởi biến $prefix.
Mỗi tab có id riêng, vì viết chung fields cho các tabs nên các fields của tab bạn cần liệt kê theo thứ tự nằm trong tab mở và tab đóng như thế này.
$eto_custom_meta_fields = array(

	/* -- TAB 1 -- */
	array(
		'id'	=> $prefix.'tab1', // Use data in $eto_custom_tabs
		'type'	=> 'tab_start'
	),

	/* Your fields here */
	...
	array(
		'type'	=> 'tab_end' // Close Tab
	)
);
Tạo trường Options
Plugin hỗ trợ đầy đủ các trường của form, và trường tùy biến khác tạo bởi plugin như hiển thị label Title.
Title
array(
		'label'=> 'Title',
		'id'	=> $prefix.'title',
		'type'	=> 'title'
	),
Text input field
array(
		'label'=> 'Text Input',
		'desc'	=> 'A description for the field.',
		'id'	=> $prefix.'textinput',
		'type'	=> 'text'
	),
Demo: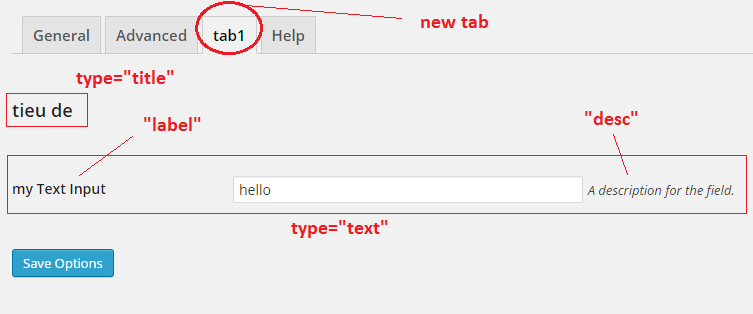
Password input field
array(
		'label'=> 'Password Input',
		'desc'	=> 'A description for the field.',
		'id'	=> $prefix.'password',
		'type'	=> 'password'
	),
Textarea field
array(
		'label'=> 'Textarea',
		'desc'	=> 'A description for the field.',
		'id'	=> $prefix.'textarea',
		'type'	=> 'textarea'
	),
Checkbox field
array(
		'label'=> 'Checkbox Input',
		'desc'	=> 'A description for the field.',
		'id'	=> $prefix.'checkbox',
		'type'	=> 'checkbox'
	),
Select Box
array(
		'label'=> 'Select Box',
		'desc'	=> 'A description for the field.',
		'id'	=> $prefix.'select',
		'type'	=> 'select',
		'options' => array (
			'one' => array (
				'label' => 'Option One',
				'value'	=> 'one'
			),
			'two' => array (
				'label' => 'Option Two',
				'value'	=> 'two'
			),
			'three' => array (
				'label' => 'Option Three',
				'value'	=> 'three'
			)
		)
	),
Thêm thẻ option cho select mỗi option có chuỗi hiển thị và giá trị của nó, làm như đoạn code trên.
Radio Group
array (
		'label' => 'Radio Group',
		'desc'	=> 'A description for the field.',
		'id'	=> $prefix.'radio',
		'type'	=> 'radio',
		'options' => array (
			'one' => array (
				'label' => 'Option One',
				'value'	=> 'one'
			),
			'two' => array (
				'label' => 'Option Two',
				'value'	=> 'two'
			),
			'three' => array (
				'label' => 'Option Three',
				'value'	=> 'three'
			)
		)
	),
Tương tự cách tạo select, thành phần radio có tính năng giống select gồm nhiều giá trị lựa chọn.
Checkbox Group
array (
		'label'	=> 'Checkbox Group',
		'desc'	=> 'A description for the field.',
		'id'	=> $prefix.'checkbox_group',
		'type'	=> 'checkbox_group',
		'options' => array (
			'one' => array (
				'label' => 'Option One',
				'value'	=> 'one'
			),
			'two' => array (
				'label' => 'Option Two',
				'value'	=> 'two'
			),
			'three' => array (
				'label' => 'Option Three',
				'value'	=> 'three'
			)
		)
	),
Nhóm checkbox gồm nhiều checkbox có giá trị gộp chung vào biến lấy kết quả từ form nên có thuộc tính name giống nhau kiểu giá trị mảng. Kiểm tra thẻ HTML của checkbox group bạn sẽ thấy nội dung kiểu như sau, ví dụ:
<input type="checkbox" value="one" name="eto_settings[eto_checkbox_group1][]" id="eto_settings[one]">
<label for="one">Option One</label>

<input type="checkbox" value="two" name="eto_settings[eto_checkbox_group1][]" id="eto_settings[two]">
<label for="two">Option Two</label>

<input type="checkbox" value="three" name="eto_settings[eto_checkbox_group1][]" id="eto_settings[three]">
<label for="three">Option Three</label>
Add a Taxonomy list
array(
		'label' => 'Category',
		'id'	=> 'category',
		'type'	=> 'tax_select'
	)
Một số kiểu dữ liệu khác
Trường chọn category.
array(
		'label' => 'Category',
		'id'	=> 'category',
		'type'	=> 'tax_select'
	),
Danh sách posts
array(
		'label' => 'Post List',
		'desc' => 'A description for the field.',
		'id' 	=>  $prefix.'post_id',
		'type' => 'post_list',
		'post_type' => array('post','page')
	),
Bạn có thể hiển thị thêm post type nếu muốn.
Date Field – chọn ngày tháng
array(
		'label'	=> 'Date',
		'desc'	=> 'A description for the field.',
		'id'	=> $prefix.'date',
		'type'	=> 'date'
	),
Image Upload – chọn ảnh
array(
		'label'	=> 'Image',
		'desc'	=> 'A description for the field.',
		'id'	=> $prefix.'image',
		'type'	=> 'image'
	),
Slider Field
array(
		'label'	=> 'Slider',
		'desc'	=> 'A description for the field.',
		'id'	=> $prefix.'slider',
		'type'	=> 'slider',
		'min'	=> '0',
		'max'	=> '100',
		'step'	=> '5'
	),
Sửa giá trị min-max giới hạn giá trị trong khoảng cho slider.
Color Picker – chọn mầu
array(
		'label'	=> 'Color Picker',
		'desc'	=> 'A description for the field.',
		'id'	=> $prefix.'colorpicker',
		'type'	=> 'colorpicker'
	),
Ngoài ra, bạn cũng có thể định nghĩa kiểu trường riêng, bằng cách thêm vào file includes/eto_functions.php, tìm tên trường có sẵn trong plugin và để bắt chiếc học cách viết.
Lấy giá trị trường Option
Có 2 cách lấy giá trị theme option, do cách lưu dữ liệu mã hóa chung vào chuỗi và toàn bộ dữ liệu options có trong plugin được lưu vào tên option ‘eto_settings’, bạn có thể lấy chúng bởi hàm get_option.
// Easy Theme Options
$eto_options = get_option('eto_settings');
global $eto_options;
Thêm đoạn code trên vào hook wp_head và tạo dữ liệu global bạn có thể trích xuất option từ file theme. Tên option và giá trị chứa trong mảng $eto_options, ví dụ: xác định tên option muốn lấy giá trị.
echo $eto_options["eto_slogan"]
Plugin thiết kế thêm tính năng cho bạn import/export dữ liệu options, truy cập Settings->ETO Import/ Export.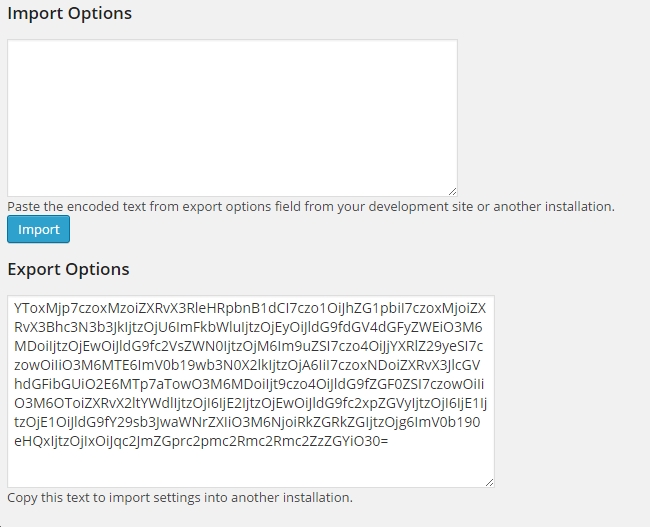
Copy Chuỗi mã hóa thông tin options tại mục Export Options và copy vào mục trên ‘Import Options’ ở site wordpress có cài plugin này để backup toàn bộ dữ liệu options.
Đối với trường image, plugin có thiết kế hàm riêng giúp bạn hiển thị ảnh hoặc lấy URL ảnh. Cấu trúc:
eto_image($field_id, $width="", $height="")
Ví dụ: nếu field id = “logo” ta có:
eto_image('eto_logo')
Hàm trên echo tag img, nhưng nếu bạn chỉ muốn lấy URL ảnh, chúng ta sử dụng hàm eto_get_image.
echo eto_get_image('eto_logo')
Shortcode
Một vài shortcode cho bạn chèn linh hoạt vào widget text hay nội dung bài viết. Cú pháp:[option id="field_id"]. Trong đó: thay ‘field_id’ bởi thuộc tính id bằng id của field bạn sẽ hiển thị nội dung.
Để hiển thị ảnh trực tiếp vào posts/pages bạn dùng shortcode image: [image id="field_id"].
Nếu bạn thấy bài viết này hữu ích, hãy chia sẻ với bạn bè bằng cách nhấn nút chia sẻ ở bên dưới. Theo dõi chúng tôi trên Twitter và Facebook
Liên hệ
Công ty chuyên Thiết kế website uy tín nhất Miền Bắc: http://vinastar.net
Hotline tư vấn: 0989 48 3456
Nguồn: Sưu tầm trên internet